Key takeaways
- Group tools by task rather than type, so a single reach completes a step instead of three.
- Trace hook outlines with a fine marker once placement is settled, and returning tools becomes automatic.
- Keep dense items like clamps and mallets in the hip-to-shoulder band and low on the panel, closest to structure.
- Add a mid-span fastener on panels wider than 32 inches to stop long-term bowing.
What's inside
A pegboard wall fails in one of two ways: it comes loose, or it works fine and you still hate using it. The first is a fastening problem, the second is an ergonomics problem, and most installation instructions only address half of that. Panels get hung wherever there happens to be blank wall, hooks end up above shoulder height, and within a month the board holds three things you rarely need while the tools you actually reach for stay scattered on the bench.
This guide covers both halves. You’ll learn how to read your wall before you drill, how to set panel height around your own reach envelope instead of guessing, why the gap behind the board matters more than the screws, and how panel material determines whether the system survives ten years in an unheated garage. Below are the panels, kits, and hardware we keep coming back to.
As an Amazon Associate we earn from qualifying purchases.


🛒 Best Price Today on Amazon
Prime members get fast, free shipping on everything above, plus member-only deals. New members get a 30-day free trial — cancel anytime.
Read the Wall First, Then Pick Your Fasteners
Every load a pegboard carries eventually lands on the wall structure, so identify what you’re working with before anything else. Find your studs with a magnet or scanner and mark centerlines with painter’s tape at eye level; most homes run 16 inches on center, some 24. Anchoring into framing is always the strongest option. Where studs don’t line up with panel edges, heavy-duty toggle anchors are the next best choice, though published pull-out ratings come from ideal lab conditions in fresh drywall, so plan on a fraction of those numbers in practice. On masonry or concrete block, switch to sleeve anchors and a hammer drill. If your wall is old plaster and lath, skip anchors entirely and screw horizontal furring strips into the studs, then mount panels to the strips.
Set Height Around Your Reach, Not the Wall’s Center
This is where most installations go sideways. Your comfortable working zone runs roughly from hip to shoulder, about 30 to 50 inches off the floor for an average adult, and that band should hold whatever you grab daily. Reaching above shoulder height loads the rotator cuff and forces you onto your toes with something heavy in hand, so treat anything above 66 inches as seasonal storage only. Over a workbench, leave 4 to 6 inches of clearance between the bench surface and the bottom panel edge so you can still set a box down without scraping hooks. Standing at your bench and marking where your knuckles naturally fall takes thirty seconds and beats any table of averages.
The Gap Behind the Board Is the Whole Trick
Hardboard pegboard needs roughly a half inch of air behind it, because peg hooks have a barb that hooks through and curls into the cavity. Screw the panel flat to drywall and the hooks won’t seat, or they’ll pop out every time you lift a tool. Spacers solve this cleanly: the Hotop 24-set mounting kit includes the standoffs, screws, and washers sized for both 1/8-inch and 1/4-inch boards, which saves a trip to the hardware aisle. Furring strips work too and add rigidity across the span. Most steel panels, including the Wall Control galvanized pegboard and the INCLY 48×36 kit, are formed with their own integral offset, so they mount flat to the wall and skip this step entirely.
Material Decides How Long It Lasts
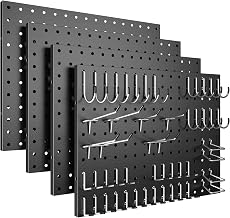
Hardboard is inexpensive and easy to cut, but it absorbs humidity, and holes gradually deform under repeated hook loads until they gape. Steel panels hold their hole geometry indefinitely and carry considerably more weight per square foot. In an unconditioned or coastal garage, galvanized steel is the durable pick; the Wall Control panels are the reference point here and take slotted hooks as well as pegs. Powder-coated black systems like the Spampur four-pack or the heavy-duty four-pack panels look sharper in a craft room, laundry area, or office and still outlast hardboard by a wide margin. Whichever you choose, confirm hook compatibility before you buy accessories, since 1/8-inch and 1/4-inch hooks are not interchangeable.
A Mounting Sequence That Holds Up
Lay panels out on the floor first and arrange your heaviest tools on them to confirm the layout before a single hole exists. Transfer stud lines to the wall with tape. Screw a temporary ledger board level at your intended bottom edge, then rest the panel on it while you drive fasteners; this is the difference between a one-person job and a two-person argument. Pre-drill hardboard to prevent blowout, add a washer under every screw head to spread load, and stop tightening as soon as the panel is snug. Overdriven screws crush hardboard around the hole and dimple thin steel. Fasten at every stud along the top edge before working downward.
Tips
- Group tools by task rather than type, so a single reach completes a step instead of three.
- Trace hook outlines with a fine marker once placement is settled, and returning tools becomes automatic.
- Keep dense items like clamps and mallets in the hip-to-shoulder band and low on the panel, closest to structure.
- Add a mid-span fastener on panels wider than 32 inches to stop long-term bowing.
Frequently Asked Questions
How much weight can a pegboard wall actually hold?
Panel material sets one limit and fasteners set the other, and the fasteners usually govern. Steel panels mounted into studs handle heavy hand tools comfortably; hardboard on drywall anchors should stay in the light-to-moderate range. Distribute weight across several mounting points instead of loading one section.
Can I mount pegboard without hitting studs?
Yes, with heavy-duty toggle anchors, but derate your expectations substantially and keep the heaviest items off those sections. Furring strips anchored into studs, with panels attached to the strips, is the more reliable workaround.
Do metal pegboards still need spacers?
Usually not. Most steel panels are formed with a built-in standoff at the mounting flange. Check the product’s own instructions, since a few thin-gauge designs still expect a spacer.
Will this work in a rental?
Build a freestanding frame or use a French cleat on a single anchored rail, which concentrates repairs into one patchable line rather than dozens of holes.
Conclusion
Good pegboard installation is unglamorous: locate structure, set height to your own body, respect the clearance the hooks need, and choose panel material that matches the room’s climate. Get those four right and the wall stays tight, stays organized, and quietly saves you a few minutes every single time you work.