Key takeaways
- Use a level on both the mounting rail and the finished panel; a small error becomes obvious across multiple panels.
- Photograph the empty layout before rearranging it, especially in a shared workshop where tool locations matter.
- Keep a few spare hooks and spacers on hand so a changed tool collection does not require replacing the whole system.
- Do not exceed the lowest load rating among the panel, fasteners, anchors, and accessories.
What's inside
A pegboard can turn an awkward wall into useful storage, but a neat-looking installation is not automatically a durable one. The real test is whether the board stays flat under load, whether tools can be reached without awkward twisting, and whether the layout still works six months after installation. Poorly supported panels flex, hooks pull loose, and overloaded arrangements gradually become frustrating.
This guide explains how to install pegboard for dependable everyday use. You will learn how to choose the right panel and hardware, locate studs, create the necessary wall clearance, distribute weight, and arrange accessories around comfortable reach zones. The recommendations favor stable, serviceable systems rather than the cheapest possible setup.
As an Amazon Associate we earn from qualifying purchases.


🛒 Best Price Today on Amazon
Prime members get fast, free shipping on everything above, plus member-only deals. New members get a 30-day free trial — cancel anytime.
Choose the right pegboard system
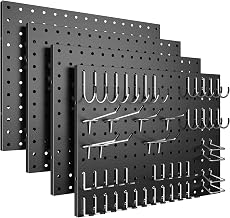
Start with the wall, the load, and the type of access you need. Metal panels are generally the strongest choice for garages, workshops, and tool storage because they resist cracking and tolerate repeated hook changes. The Spampur Peg Board 4 Pack is a flexible multi-panel option for covering a broader area, while the Wall Control Pegboard Organizer 4 ft. Metal Pegboard Standard Tool Storage Kit is a more unified choice when you want the panel and accessories to work as one system.
For lighter office, craft, or display storage, a smaller accessory assortment may be sufficient. The Peg Board Kit with Hooks and Bins, 66-Piece White suits compact organization, while the Pegboards Wall Organizer Panels, 4-Piece format can help create a modular arrangement across several sections of wall. Check the panel material, hole size, included spacers, and stated weight capacity before buying. A hook set designed for 1/4-inch holes will not necessarily fit a 1/8-inch board securely.
Plan the layout before drilling
Measure the available wall and mark the intended outside edges with painter’s tape. Keep the board high enough to preserve usable floor or workbench space, but low enough that the upper hooks can be reached without stretching. For most adults, the most frequently used items should sit between shoulder and waist height. Reserve the top row for occasional-use items and the lower area for lighter objects that can be lifted safely.
Place a workbench, desk, or cabinet first if one will sit below the pegboard. The surface should not block the lowest row of hooks, and there should be enough clearance to remove tools without striking the furniture. If installing several panels, align them carefully and leave only the gap recommended by the manufacturer. A level, tape measure, stud finder, pencil, and drill are more valuable here than rushing into assembly.
Build a load-bearing installation
Pegboard needs an air gap behind it so hooks can pass through and engage properly. Use the supplied spacers or install continuous furring strips behind the panel. These strips should be firmly fixed to wall studs wherever possible. For masonry or plaster walls, use anchors rated for the wall material and the expected load; do not assume a general-purpose plastic anchor will safely hold a collection of hand tools.
Find and mark the center of each stud, then transfer those marks to the panel or its mounting rails. Drive screws through the board, spacers, and into the studs. Use washers if the screw heads could pull through the panel. When studs do not line up with the desired panel edges, add a properly secured horizontal mounting rail rather than relying on unsupported panel corners. Tighten fasteners until snug, not until the metal or board bows inward.
Distribute weight for comfort and stability
Think of the pegboard as a storage map, not merely a wall covering. Put dense items close to supported mounting points and avoid concentrating several heavy tools on one small section. Hammers, drills, clamps, and loaded bins should be spread across the panel. Light items such as measuring tapes, brushes, scissors, and small craft supplies can occupy the outer or upper zones.
Hook shape matters as much as hook strength. Use paired hooks or a cradle for tools with an uneven center of gravity, and select locking hooks where repeated removal could make ordinary hooks jump out. The Peg Board 110-Piece Metal Pegboard Kit includes hook locks and accessories intended for a larger, heavier-duty arrangement. If you need broader compatibility rather than a matched kit, the INCLY 278-Piece Pegboard Accessories Organizer Kit is designed for both 1/8-inch and 1/4-inch pegboards, but verify the fit before ordering.
Install accessories and test the result
Begin with the items you use most often, then fill in the supporting tools around them. Leave a small amount of empty space between handles and bins so your hand can grip each item without catching neighboring accessories. Labeling bins is worthwhile when several compartments contain similar fasteners or craft materials. For children’s rooms or shared spaces, keep sharp tools and heavy objects outside easy reach.
After loading the board, pull each frequently used tool straight out several times. Watch for panel movement, loose screws, tilting hooks, or contact with the wall. If anything shifts, unload that area and correct the mounting before adding more weight. Recheck the fasteners after a week of use; minor settling is common, and early adjustment prevents long-term loosening.
Tips
- Use a level on both the mounting rail and the finished panel; a small error becomes obvious across multiple panels.
- Photograph the empty layout before rearranging it, especially in a shared workshop where tool locations matter.
- Keep a few spare hooks and spacers on hand so a changed tool collection does not require replacing the whole system.
- Do not exceed the lowest load rating among the panel, fasteners, anchors, and accessories.
Frequently Asked Questions
Should pegboard be mounted directly against the wall?
Usually no. Most pegboard systems need a rear clearance gap for hooks to engage and for accessories to sit correctly. Use the supplied spacers or securely mounted furring strips. Direct mounting can also place unnecessary stress on the panel when hooks are loaded.
Is metal pegboard better than hardboard?
Metal is typically better for heavy tools, frequent rearrangement, and humid areas because it resists splitting and wear. Hardboard can be economical and perfectly suitable for light craft or office storage, provided it is well supported and kept within its load limits.
Can I install pegboard without locating studs?
Yes, in some situations, but the anchors must be specifically rated for the wall type and the intended load. For a garage or workshop, fastening at least the main mounting points to studs is the more reliable approach. When studs are unavailable, use a properly secured mounting rail to spread the load.
How much weight can a pegboard hold?
There is no universal figure. Capacity depends on panel material, fastener spacing, wall construction, spacer design, and the way weight is distributed. Treat manufacturer ratings as a system rating, not permission to load one hook or corner to that maximum.
Conclusion
The best pegboard installation combines a suitable panel with sound wall attachment, correct clearance, and a layout built around natural reach. Favor studs or properly rated anchors, spread heavy items across supported areas, and test the loaded board before calling the job finished. A thoughtfully installed system will make tools easier to find while staying stable through years of everyday use.