Key takeaways
- No stated clamp range. If the listing does not give a minimum and maximum desktop thickness, assume it is under 1.6 inches and will not fit a solid wood top.
- Adhesive as the only mounting option for a tray over 20 inches wide. Adhesive cannot hold a loaded tray that long over time.
- Photos that show only two thin cables in the tray. That is a sign the tray is shallow or weak.
- No front lip or side walls under 1 inch. Power strips slide out when a standing desk moves.
- “Universal fit” with no dimensions listed anywhere.
- Plastic clamps on a steel tray. The clamp is the failure point; both should be metal.
- Painted rather than powder-coated steel. Paint chips at the clamp contact points and rusts in humid rooms.
What's inside
- Decide These 3 Things First
- Size: Match Width to Your Load, Not Your Desk
- Material: Steel Mesh, Solid Steel, or Fabric
- Construction: How It Attaches Decides Everything
- Performance: Load Capacity and Access
- Price Tiers: What Each Dollar Buys
- Delivery and Installation: 10 Minutes If You Measured
- Spec Checklist
- Red Flags
- FAQ
- Related Guides
Most people buy a cable tray the same way they buy a phone charger: they grab the cheapest one with decent reviews and assume it will fit. Then it arrives, and the clamp is too small for their 1.2 inch desktop, or the tray is 25 inches wide when their power strip is 14 inches and their desk is 60, or it is a fabric sling that sags under two power bricks. The tray goes back, or worse, it stays half-installed and the cables hang out the sides.
- Decide These 3 Things First
- Size: Match Width to Your Load, Not Your Desk
- Material: Steel Mesh, Solid Steel, or Fabric
- Construction: How It Attaches Decides Everything
- Performance: Load Capacity and Access
- Price Tiers: What Each Dollar Buys
- Delivery and Installation: 10 Minutes If You Measured
- Spec Checklist
- Red Flags
- FAQ
- Related Guides
The second most common mistake is buying a tray before deciding what goes in it. A single power strip and three cords need a completely different tray than a power strip, a laptop dock, a USB hub, and a desktop PC’s brick. This guide walks through the decisions in the order that actually prevents returns, with real dimensions and price ranges so you can match a tray to your desk on the first try.
As an Amazon Associate we earn from qualifying purchases at no extra cost to you. Product prices and availability are accurate as of the date shown and are subject to change.



Decide These 3 Things First
1. What is going in the tray? Lay everything on the floor and measure it. A standard 6-outlet power strip is about 11 to 13 inches long and 2 inches wide. A 12-outlet strip is 15 to 19 inches. A laptop power brick is roughly 4 x 2 x 1.5 inches; a monitor’s external adapter is similar. A tray needs at least 2 inches of clearance on each end of the longest item and 3 to 4 inches of depth to hold the strip plus a layer of cable slack on top.
2. Can you drill into the desk? If the desk is a rental, solid wood you do not want to mark, glass, or a laminate top under 0.75 inches thick, you want a clamp-on or no-drill tray. If it is your own 1 inch particleboard or plywood top, screw-mounted trays are cheaper, sit tighter, and hold more weight. Every product in the reference list above is a no-drill design for a reason: it is the safer default.
3. Is the desk fixed or height-adjustable? On a standing desk, the tray moves with the top, so all cables from the wall must have enough slack to travel the full height range, typically 18 to 22 inches. The tray also has to clear the frame’s crossbar and motor housing, which usually occupy the center 3 to 5 inches of the underside on single-motor frames.
Size: Match Width to Your Load, Not Your Desk
Cable trays come in three common width bands. Short trays of 15 to 17 inches hold a single power strip and a few cords, which suits a laptop-plus-monitor setup. Mid trays of 24 to 26 inches, like the 25.3 inch no-drill tray at around $22, fit a large power strip plus one or two adapters and are the right size for most dual-monitor desks. Long trays of 32 to 36 inches, such as the 36 inch Univivi at around $36, are for desks 60 inches and wider carrying a PC, dock, and multiple bricks, or for anyone who wants the entire underside covered.
Depth matters as much as width. A tray body of 4 to 5 inches wide and 3 to 4 inches deep is standard. Anything under 3 inches deep will not hold a power strip with cables plugged in vertically. Anything over 6 inches deep starts to intrude on knee space on a 29 inch desk.
Sets of two smaller trays, like the two-piece set at around $35, let you split loads: one tray for the power strip, one for the dock and hub. This is often cleaner than one long tray because you can position each unit exactly where its cables originate.
Material: Steel Mesh, Solid Steel, or Fabric
Steel mesh is the best all-around choice. It is rigid enough to hold 10 to 15 pounds without sagging, lets heat from power bricks escape, and lets you see where every cable goes. Typical wall thickness is 1.5 to 2 mm wire with a powder coat that resists chipping. Solid sheet steel trays look cleaner from the side but trap heat and hide problems; they make sense on desks visible from behind.
Fabric or neoprene slings cost $10 to $20 and are lighter, but they sag, trap heat, and make it hard to add or remove a cable without unclipping the whole thing. Plastic trays, common under $15, are fine for a couple of thin cables but crack at the mounting points under a power brick’s weight after a few months of standing desk vibration.
Construction: How It Attaches Decides Everything
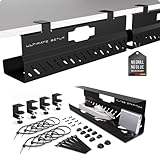
Clamp mounts use a screw-tightened jaw that grips the desk edge. Check the jaw range against your desktop thickness: most fit 0.6 to 2 inches, but some budget clamps top out at 1.6 inches, which excludes many 1.75 inch solid wood tops. The two-hole metal mesh clamp tray at around $15 is a typical entry example. Clamp trays place the tray at the rear edge, which is fine if your cables come from the back of the desk but awkward if the desk sits against a wall with 2 inches of clearance.
Adhesive mounts use 3M-style VHB strips and hold 5 to 10 pounds when applied to a clean, sealed surface. They fail on raw MDF, textured laminate, and anything dusty. Adhesive makes sense for a light load on a glass desk, not for a power strip with six bricks.
Screw mounts are the strongest, holding 20 pounds or more, and cost the least, but they need a solid top at least 0.75 inches thick and permanent holes.
Look for a tray with open ends or large cutouts so cables enter without sharp bends, and for a lip of at least 1 inch on the front edge so a power strip cannot slide out when the desk moves.
Performance: Load Capacity and Access
A realistic load for a dual-monitor desk is a 2 pound power strip, a 1.5 pound laptop brick, a 1 pound monitor adapter, a USB hub, and 10 to 15 feet of cable slack, totaling 6 to 9 pounds. A good mesh clamp tray is rated in the 10 to 20 pound range, which gives comfortable margin. Trays marketed as “huge load capacity” typically mean 20 to 30 pounds, relevant only if you plan to hang a small PC or a UPS underneath.
Access is the feature people forget. A tray you have to unclip to add a charging cable will fill up with cables you never route properly. Choose a top-open design you can reach into from the seated position, and mount it 2 to 4 inches from the rear edge so the power strip’s cord reaches the wall outlet without hanging.
Price Tiers: What Each Dollar Buys
Under $20 gets a single mesh clamp tray of 15 to 17 inches, or a plastic or fabric tray of 24 inches. Expect thinner wire, a smaller clamp range, and no included cable ties or adhesive anchors. The $20 to $30 range is the sweet spot: a 24 to 26 inch steel mesh tray with a 2 inch clamp range, a front lip, and usually a bag of Velcro straps and adhesive clips. From $30 to $45 you get either two trays, a 32 to 36 inch single tray, or a heavier gauge steel with a thicker powder coat. Above $50 you are paying for aluminum extrusions, magnetic lids, or integrated power strips, none of which improve cable management much for a home office.
Delivery and Installation: 10 Minutes If You Measured
Trays ship flat in a box about 30 x 8 x 5 inches and weigh 2 to 5 pounds. Installation for a clamp tray takes 5 to 10 minutes with no tools beyond the included thumbscrews. Position the tray, tighten both clamps evenly, then load the power strip first and route cables from the devices down into the tray, not from the wall up. Leave a 20 to 22 inch service loop from the tray to the wall on a standing desk. Adhesive trays need 24 hours of cure time before loading. Screw trays take 15 minutes with a drill and pilot bit.
Spec Checklist
| Spec | Budget | Mid | Premium |
|---|---|---|---|
| Price | $10 to $20 | $20 to $35 | $35 to $60 |
| Width | 15 to 17 in | 24 to 26 in | 32 to 36 in, or 2-piece set |
| Tray depth | 2.5 to 3 in | 3 to 4 in | 4 to 5 in |
| Material | Plastic, fabric, or thin mesh | 1.5 to 2 mm steel mesh, powder coat | 2 mm+ steel or aluminum |
| Mount | Adhesive or small clamp | Clamp, 0.6 to 2 in range | Clamp to 2.4 in or screw plus clamp |
| Rated load | 5 to 8 lb | 10 to 20 lb | 20 to 30 lb |
| Included extras | None | Velcro ties, adhesive clips | Ties, clips, cable sleeve, spare hardware |
| Warranty | None or 30 days | 1 year | 1 to 3 years |
Red Flags
- No stated clamp range. If the listing does not give a minimum and maximum desktop thickness, assume it is under 1.6 inches and will not fit a solid wood top.
- Adhesive as the only mounting option for a tray over 20 inches wide. Adhesive cannot hold a loaded tray that long over time.
- Photos that show only two thin cables in the tray. That is a sign the tray is shallow or weak.
- No front lip or side walls under 1 inch. Power strips slide out when a standing desk moves.
- “Universal fit” with no dimensions listed anywhere.
- Plastic clamps on a steel tray. The clamp is the failure point; both should be metal.
- Painted rather than powder-coated steel. Paint chips at the clamp contact points and rusts in humid rooms.
FAQ
How wide should a cable tray be for a 60 inch desk?
Width should match the load, not the desk. For a 60 inch desk with two monitors and a laptop, a 24 to 26 inch tray centered under the monitors is typical. If you also run a desktop PC and a dock, go to 32 to 36 inches or use two trays.
Will a clamp-on tray damage my desk?
A properly padded clamp will not mark a laminate or sealed wood surface. On soft pine or an oil-finished top, place a thin piece of cork or felt under the clamp pad. Avoid clamps on desks with a lip or waterfall edge under 0.6 inches thick.
Can I mount a cable tray on a standing desk frame instead of the top?
Some trays are designed to hang from the frame’s crossbar, but most clamp to the desktop. In 2026 the majority of budget single-motor frames leave 10 to 14 inches of clear underside on each side of the center bar, which is where a 24 to 26 inch tray should go.
Do I need one tray or two?
One tray is enough when every device sits within 24 inches of a single point under the desk. Two trays make sense on L-shaped desks, on desks 70 inches or wider, or when you want the power strip in one spot and a dock or hub several feet away.